Longdraw BC16 Mechanism
2/24/12
Longdraw BC16 Mechanism
In order to explain the mechanism of the Longdraw BC16 better, I made a video explaining and showing how it works. To see more about the gun, see my original post.

2/23/12
Ultimate Lego Gun: Longdraw BC16
The Longdraw BC16 is the Ultimate Lego Gun. It has great power, accuracy, rate of fire and range. It also has a pretty sweet video. Check it out:
Ultimate Lego Gun: Longdraw BC16
Some background info after the jump...
2/20/12
Ultimate Lego Gun Sneak Peek
Here's a sneak peek of my new Lego gun, a rifle with enough power to destroy a 4 layer Lego wall at 10 feet (3 meters). Most of my other guns consider themselves powerful when they can destroy a 4 layer wall at point blank range!
Ultimate Lego Gun Sneak Peek
2/15/12
Robotics Competiton Hint
In case you were wondering how to make your robot grab cubes and lift them to score with only one motor, here's a simple mechanism that is able to to both. It isn't robust enough to wok well in the competition yet, but with a bit of modification it could work quite nicely.
Hint:
2/14/12
DroidFreak Lego Robotics Competition 2012 - rules
Welcome to the first DroidFreak Lego Robotics Competition. This competition will be conducted over the internet, so anyone can enter by building a Lego robot and posting it online. Spread the word to anyone who might be interested so they can enter too.
See my playing field post for some of the basics.
NXT only:
This category allows only the electronics from one Lego Mindstorms NXT set to be used, the sole exception being an IR receiver sensor if you wish to control your robot via IR. This places all contestants on a reasonably level playing field, though it will be difficult to make a 3-motor robot perform all the functions (That's why I allow going around the obstacle).
NXT + PF:
This category allows the electronics from one NXT set, IR receiver and/or IR link sensors, and Power Functions electronics consisting of 1 battery box, one receiver, and the number of motors Lego recommends to be used with a battery box (2 XL, 1 XL + 2M, 4M). By giving robots a few extra motors this category makes it much more feasible to perform all the game's functions.
All Lego:
This category allows any and all Lego electronics. Have fun building a complicated machine that can use any number of NXT, RCX and PF motors, not to mention all the other Lego electronics. If you have enough Lego electronics you could build a robot for this category that performs extremely well in the game.
See my playing field post for some of the basics.
There will be three categories in the competition:
NXT only:
This category allows only the electronics from one Lego Mindstorms NXT set to be used, the sole exception being an IR receiver sensor if you wish to control your robot via IR. This places all contestants on a reasonably level playing field, though it will be difficult to make a 3-motor robot perform all the functions (That's why I allow going around the obstacle).
NXT + PF:
This category allows the electronics from one NXT set, IR receiver and/or IR link sensors, and Power Functions electronics consisting of 1 battery box, one receiver, and the number of motors Lego recommends to be used with a battery box (2 XL, 1 XL + 2M, 4M). By giving robots a few extra motors this category makes it much more feasible to perform all the game's functions.
All Lego:
This category allows any and all Lego electronics. Have fun building a complicated machine that can use any number of NXT, RCX and PF motors, not to mention all the other Lego electronics. If you have enough Lego electronics you could build a robot for this category that performs extremely well in the game.
1/7/12
Mini Lego Shotgun
This is a small Lego gun that fires up to 9 Lego beams in a spread
pattern like a shotgun. It's similar to the design used by rosewarrior21
in his Lego Shotgun video. It doesn't fire as many bullets as
rosewarrior21's, but mine is much smaller (thus "Mini").
Mini Lego Shotgun (working)
More info and pictures...
1/6/12
5:1 NXT Zamor Sphere Launcher
This single Zamor launcher is geared for extreme speed. Thanks to a few advanced techniques, it consistently operates at a 5:1 gear ratio.
5:1 NXT Zamor Sphere Launcher
As promised in the video description, there are more details and pictures available...
12/31/11
Robotics Competition: playing field
I have decided to hold an online robotics competition over the next few months. I don't have all the rules worked out yet, but I do have a playing field for you to play around with. It's a fairly simple playing field. It has 3 major field element arrayed in a line about a foot (30 cm) apart. Some of the playing field elements are not Lego, but Lego substitutes are allowed.


Playing field overview


In the center of the field is an obstacle. This obstacle should be a large book or a Lego plateau of similar shape. It should be about 1.25 inches (3 cm) tall and at least 8 inches (20 cm) long in the direction of the playing field's "line". The width from side to side doesn't matter much because there will be penalties for going around the obstacle. As long as it is wide enough for your robot to easily cross over there should be no problem.
Obstacle examples

Plateaus are difficult to construct out of Lego, but here's an inside view of how I made mine. The smaller baseplate is supported by several small Lego towers and held down at the corners.
Lego obstacle inside view

On one side of the obstacle is a triangular stack 15 of Lego cubes. These cubes must be made of Lego pieces, and they must have the exact dimensions 4 studs long by 4 studs wide by 3 bricks tall (approximately 4 studs cubed). The cubes are the scoring elements, so the object of the game is to put them into the goal.
A cube

A stack of 15 cubes

The goal is composed of an empty Kleenex box with the plastic removed or a Lego box of similar dimensions. If necessary, you could make a simulated Kleenex box out of cardboard. Kleenex boxes are approximately 4.5 inches (11.5 cm) wide by 8.75 inches (22 cm) long 3.5 inches (9 cm) tall with a hole 2 inches (5 cm) wide by 7 inches (18 cm) long in the center of the top. My Lego version is 30 studs by 16 studs by 9.33 bricks with a 6 stud by 22 stud hole. Note that my Lego version has no bottom. It shouldn't get flipped over during play so no bottom is necessary.
Goals


Now that you know what the playing field looks like, feel free to make one of your own and start testing prototypes. The full rules for the competition should be out sometime in January. I'm leaving for a week starting at 6 am on New Years Day (ughhhhh), so I won't be working on this for a while.
12/30/11
Pump-Action Lego Rifle
Here's the main video for my pump action Lego rifle. The video explains how the gun works and shows some better footage of it shooting stuff.
Pump-Action Lego Rifle
12/23/11
Sphere Eater
Since I make so many projects that scatter Zamor spheres across the floor, I decided to make a project that picks them up off the floor. I made a simple NXT chassis, then I built a holding tank on top of the NXT brick and an attachment to pick up the spheres. Since it seemed to eat the spheres, I decided to name it the Sphere Eater and I gave it a "Nom" sound effect that it plays whenever it detects a sphere being eaten. Since I already had the sound effect from "Nom Nom Nom Nom Nom Nom Nom", I decided to add some Nyan Cat music too. Fun.
To see some pictures and the program...
Sphere Eater
12/22/11
Hurricane Launcher mark VI
This is currently the newest model in my Hurricane Launcher series. Unlike previous models, this one doesn't focus on Rate of Fire (RoF) but rather on firepower density. The barrels are on two layers, staggered like the barrels of Brian Davis's Hailstorm Launcher to apply the force of the bullets to a smaller area. This weapon was used on Flash Flood, allowing it to destroy enemies at long range.
Hurricane Launcher mark VI
12/21/11
Cheetank: FAST Lego Tank
Today I was playing around with my Lego's (like I do every day), and I came up with an idea. Why not make a tank and gear it as fast as I can? I made a tank that's just a simple chassis, and I geared it 3:1 for speed so it flies across the ground. I named it Cheetank because it is fast like a Cheetah. When I tested it on obstacles, I was surprised to find that this tank performs almost as well as my greatest obstacle climbing tanks even though it has little torque. The sheer momentum of Cheetank bearing down on an obstacle enables it to drive right over it without stalling. The speed of the treads also helps it to achieve plenty acceleration even on rough or slippery terrains.
Cheetank: FAST Lego Tank
12/20/11
Backlog: Hurricane Launcher mark V
Because Maelstrom's gun, the Hurricane Launcher mark IV, was based off the mark II and III versions it didn't perform much better than earlier versions. I made little progress in Zamor launching technology until I created the Droideka pistols (post coming soon). Because each of them only had a single motor, they didn't fire very fast, but they used a new type of structure that was lighter than my previous Zamor launchers and I used that type of structure to produce the Hurricane Launcher mark V. It surpassed the previous RoF (Rate of Fire) record by 3 rounds per second, but more importantly it had a lighter structure and used less parts. My previous Hurricane Launchers used nearly a whole NXT set worth of parts each, but the mark V uses only a few large beams, making it easier to incorporate it into other projects by freeing up parts for use elsewhere. I have yet to make a tank using the Hurricane Launcher mark V as its gun, but I probably will at some point because the mark V is better than the previous versions.
Hurricane Launcher mark V
Pump-Action Lego Rifle sneak peek
If I told you all about it, it wouldn't be a sneak peek, would it? =)
Pump-Action Lego Rifle sneak peek
I'll tell you this much: It's a pump-action Lego rifle. But you probably already guessed that from the title.
Backlog: Maelstrom (Part 2: NXTlog and Instructions)
I posted 4 different projects on NXTlog for Maelstrom because of all the stuff I wanted to add. The following is 3 of the 4 posts, the other one is basically a repost of the Maelstrom YouTube video.


Maelstrom is my
ultimate project: A giant Lego tank armed with a Hurricane launcher. It
has a powerful drivetrain with suspension to let it climb over some
really tough terrain and its Hurricane launcher can fire 23 Zamor
spheres per second! That's 1380 spheres per minute. It has a 40 sphere
magazine so it can only fire for 1.7 seconds straight, but with short
bursts its ammo could last a while.


Maelstrom: The Ultimate Lego Tank


Drivetrain


Maelstrom can be split into two main parts, the drivetrain and the
Hurricane launcher. The drivetrain was developed over a period of about 1
month specifically for Maelstrom. It has a type of suspension I
originally tried on Tempest (a Tornado Launcher tank) with mixed success. The suspension allows gravity to
bend the tank's structure without breaking it so the tank conforms to
the terrain. It also has sprung treads so they don't fall off when the
tank bends. It is powered by PF XL motors geared for power and it has
rubber treads at the front to aid in climbing.
Hurricane Launcher mark IV


Maelstrom is armed with the Hurricane Launcher mark IV, the fourth in a
line of multi-motor Zamor launchers. Like the Hurricane mark II it uses 3
motors and like the mark III it uses an efficient firing mechanism. As I
mentioned above, it is capable of firing 23 spheres per second, which
is faster than many real machine guns. Needless to say this thing can
devastate Lego structures (stacked Lego bricks, not pushed down) and
armies.
Hurricane Launcher mark IV Instructions
This project is
the instructions on how to build the Hurricane Launcher mark IV, the
weapon of Maelstrom. Here's an overview of how it works: The 3 motors
spin 24 tooth gears which link to 8 tooth gears (which rotate 3 times as
fast) on a long crankshaft. In 4 places along the crankshaft it is
displaced from the center to make that section spin around the
crankshaft's center. Attached to those sections of the crankshaft are 4
firing mechanisms that push/pull the firing rods in and out of the Zamor
launchers as the crankshaft spins.
Maelstrom Drivetrain Instructions
This project is
the instructions on how to build the drivetrain of Maelstrom. Here's an
overview of how the suspension works: Along a few points in each side
of the drivetrain there are joints that allow it to bend. Each joint
connects 2 main beams with other beams and only a few pegs. To
keep the joint from falling apart an axle runs through it. Also, to keep
the treads from falling off they are sprung by arms pulled up by rubber
bands.
If you have any questions about the instructions, feel free to comment on this post. I'd be happy to explain.
12/19/11
Semi-Automatic Lego Pistol
I recently got an email from my friend whom I met on YouTube as jintzd. We've talked before about ideas for Lego projects (especially guns and tanks), so this wasn't the first time. In any case, this email was about HOZL, short for Hand Operated Zamor Launcher. He said it was a semi-auto Zamor launcher pistol. I liked the idea so much, I decided to make my own version, generically named "Semi-Automatic Lego Pistol" because I didn't bother to think up a good name. Despite the terrible name, this gun is pretty awesome. It can easily be put in a pocket and pulled out when needed, plus it can fire quickly, so it makes a great pistol.
Semi-Automatic Lego Pistol
ToothBot Revisited
As I mentioned in the ToothBot post, the program was pretty bad. For that reason, I decided to rebuild ToothBot and improve the program. The hardware is the same, so I won't explain that again. Here's a demonstration of the new program in action:
ToothBot Revisited
Backlog: Maelstrom (Part 1: History and Videos)
Maelstrom was my Ultimate Lego Tank, and to this day it is unmatched in firepower. Maelstrom was, in many ways, an improved version of Tempest. The idea for Maelstrom was that I would get some Power Functions (PF) motors to use in the drivetrain so I could build a full Hurricane Launcher for the weapon. Soon after I got my PF motors, I began work on the drivetrain. It was fitted with the same suspension as Tempest, but it was necessarily larger because I wanted to fit a huge Hurricane Launcher on it. The original drivetrain was great at climbing over all sorts of terrain, and it was fast too.
Improved Maelstrom Prototype
Maelstrom drivetrain prototype
Soon after the first prototype, I added some rubber treads to the front to improve its climbing ability. This allowed it to conquer some really tough terrain. Unfortunately, Maelstrom was too heavy to climb over most of the terrain the prototype could.
Improved Maelstrom Prototype
At this point, progress came to a standstill for a while. I had used most of my beams on Maelstrom's drivetrain, so I didn't have enough parts left to make a Hurricane Launcher. I ordered a pack of parts from Lego Education, but it was nearly a month before I could resume work. In the meantime, I made a video explaining Maelstrom's suspension.
Maelstrom Suspension Explained
At long last, I constructed the Hurricane mark IV and put some finishing touches on Maelstrom. This project had taken nearly a month of my summer, more time than I even spent on another Lego project.
Maelstrom: The Ultimate Lego Tank
It's also worth mentioning that this was the first appearance of DroidFreak BattleTech and its logo.
Before I took Maelstrom apart and as I took it apart, I took enough pictures for an NXTlog project and for full instructions. I plan to post those here, but this post has already gone long enough, so I'll post those separately soon.
Before I took Maelstrom apart and as I took it apart, I took enough pictures for an NXTlog project and for full instructions. I plan to post those here, but this post has already gone long enough, so I'll post those separately soon.
12/18/11
Panthera: A Climbing Lego Tank
Panthera is the name I have given to my new terrain-climbing tank. You may have already seen it in the Flash Flood video. Here's the full video of Panthera:

Panthera: A Climbing Lego Tank
Panthera came about because of a flash of inspiration I had while bored at school. I had been experimenting with a combination drive and suspension consisting of several small treads that can pivot around a point. Suddenly, I though of a way to put such treads on a tank. If I placed them at the front and back of the tank's treads, they would aid greatly in climbing. I drew up a detailed blueprint of this tank, as well as a frame-by-frame sequence showing it climb over stuff. This is a picture of my drawings:
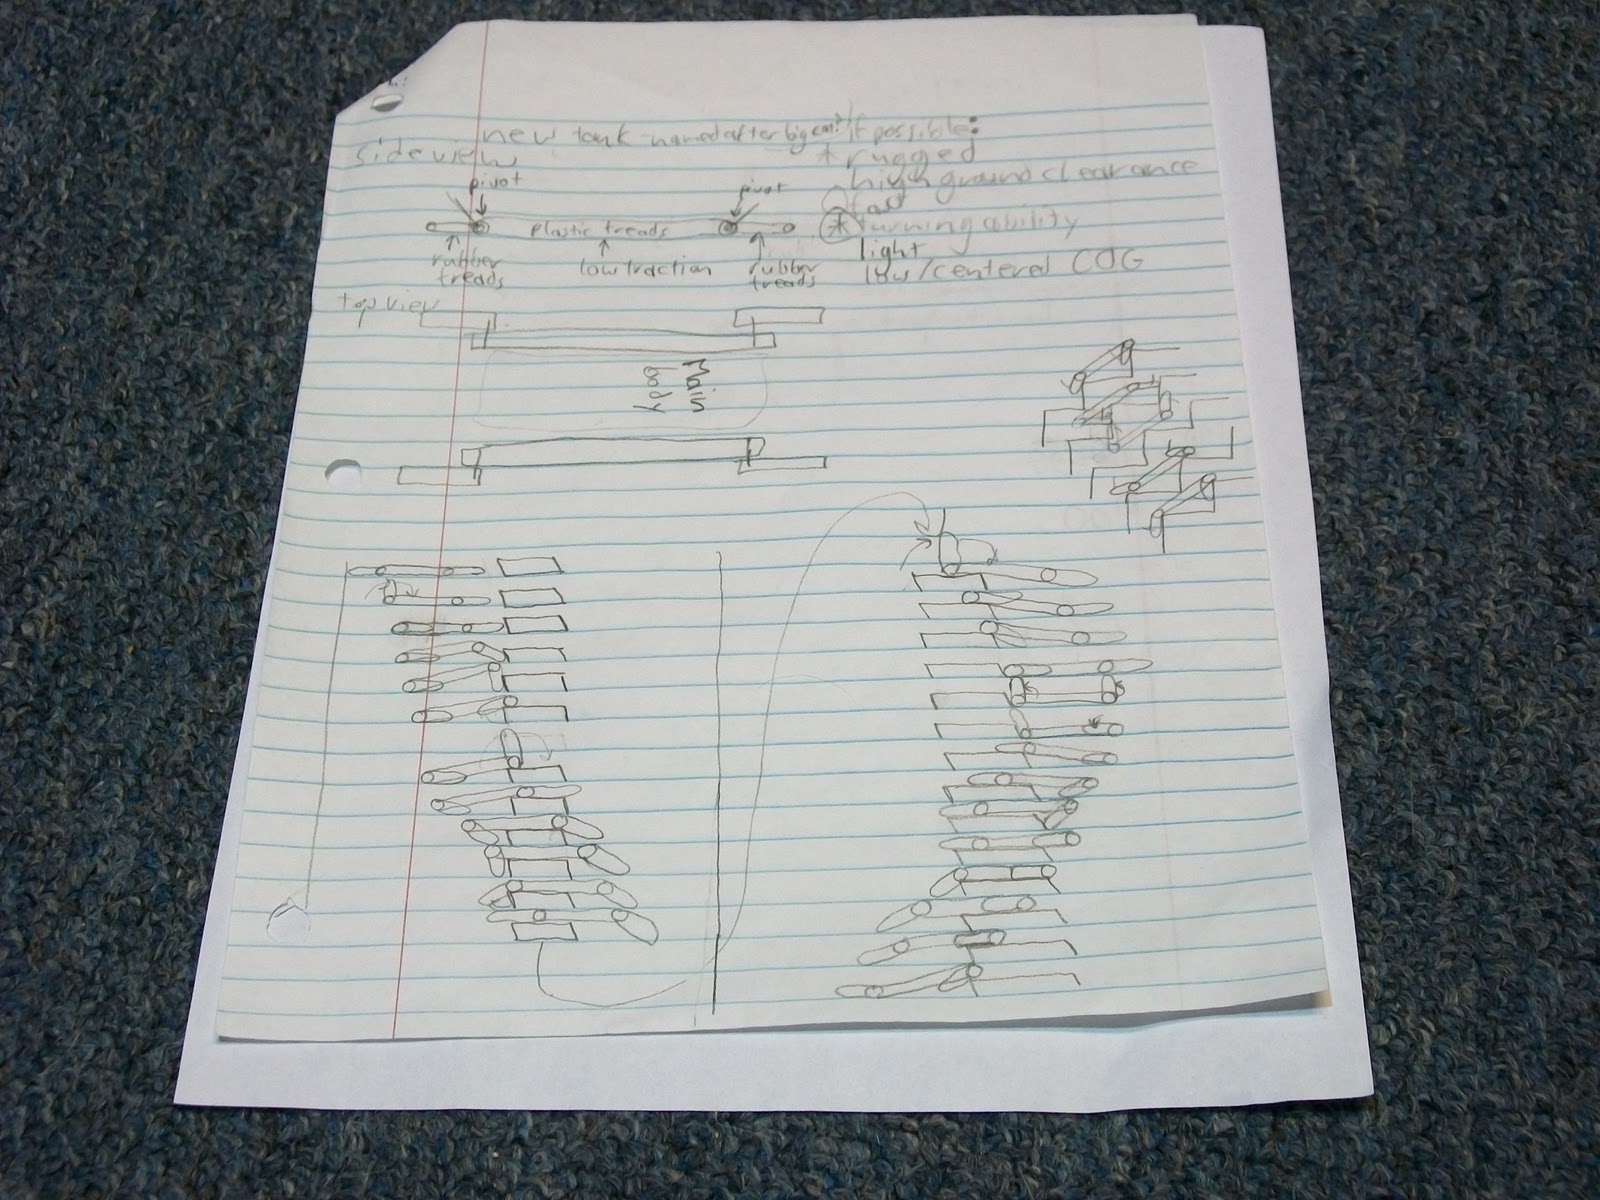
The picture quality is quite good, so feel free to zoom in and read my notes.
When I got home, I hastily made a video of Flash Flood, which was my current tank, and then I built a prototype of Panthera. Soon after that, I tested Panthera on stairs and added some clips of it to Flash Flood's video. At that point I hadn't named it, though I was thinking of naming it after some big cat because of its four paw-like rubber treads. When I discovered that all four of the commonly known big cats (Lions, Tigers, Jaguars and Leopards) belong to genus Panthera, I decided that should be the name of this tank.
12/16/11
Backlog: Lego Shotgun Catapult
Sorry I haven't posted in a while. I've been busy with school stuff, and I was sick for about a week. Now that I'm done with school for the holidays I'll be posting a lot.
This is a "lost project" because it hasn't been posted anywhere until now. Unlike most of my projects, this one uses no electronics. It's a catapult I made a while back that fires 50 small projectiles (axle pegs) over a wide area. Here's the YouTube video I just posted:
The YouTube video explains what it does, so I'll launch right into an explanation of how it does what it does.
This catapult gets its power from rubber bands, but unlike most catapults the power is transferred through gears. The rubber bands pull back on one lever arm which is connected to a 24 tooth gear. The 24t gear meshes with a 40t gear attached to the main arm. This setup helps to maximize the power of the rubber bands.
Because the small arm has rubber wheels protruding from it, it contacts and stops the main arm just as it reaches a 45 degree angle. This maximizes the range by releasing the projectiles at the best possible time.
The 50 projectiles are held within the holes of 5 parallel beams running up the main arm. Because the axle side of the axle peg projectiles is in the hole they smoothly release most of the time, but sometimes they stick and don't fire or fall short. If this were to be used as a practical weapon, there would have to be a way to keep projectiles from exploding unless they fell far enough away from the catapult.
This is a "lost project" because it hasn't been posted anywhere until now. Unlike most of my projects, this one uses no electronics. It's a catapult I made a while back that fires 50 small projectiles (axle pegs) over a wide area. Here's the YouTube video I just posted:
The YouTube video explains what it does, so I'll launch right into an explanation of how it does what it does.
This catapult gets its power from rubber bands, but unlike most catapults the power is transferred through gears. The rubber bands pull back on one lever arm which is connected to a 24 tooth gear. The 24t gear meshes with a 40t gear attached to the main arm. This setup helps to maximize the power of the rubber bands.
Because the small arm has rubber wheels protruding from it, it contacts and stops the main arm just as it reaches a 45 degree angle. This maximizes the range by releasing the projectiles at the best possible time.
The 50 projectiles are held within the holes of 5 parallel beams running up the main arm. Because the axle side of the axle peg projectiles is in the hole they smoothly release most of the time, but sometimes they stick and don't fire or fall short. If this were to be used as a practical weapon, there would have to be a way to keep projectiles from exploding unless they fell far enough away from the catapult.
Subscribe to:
Posts (Atom)