11/25/11

Backlog: Turtle Bot

This was originally posted on NXTlog more than 2 years ago:

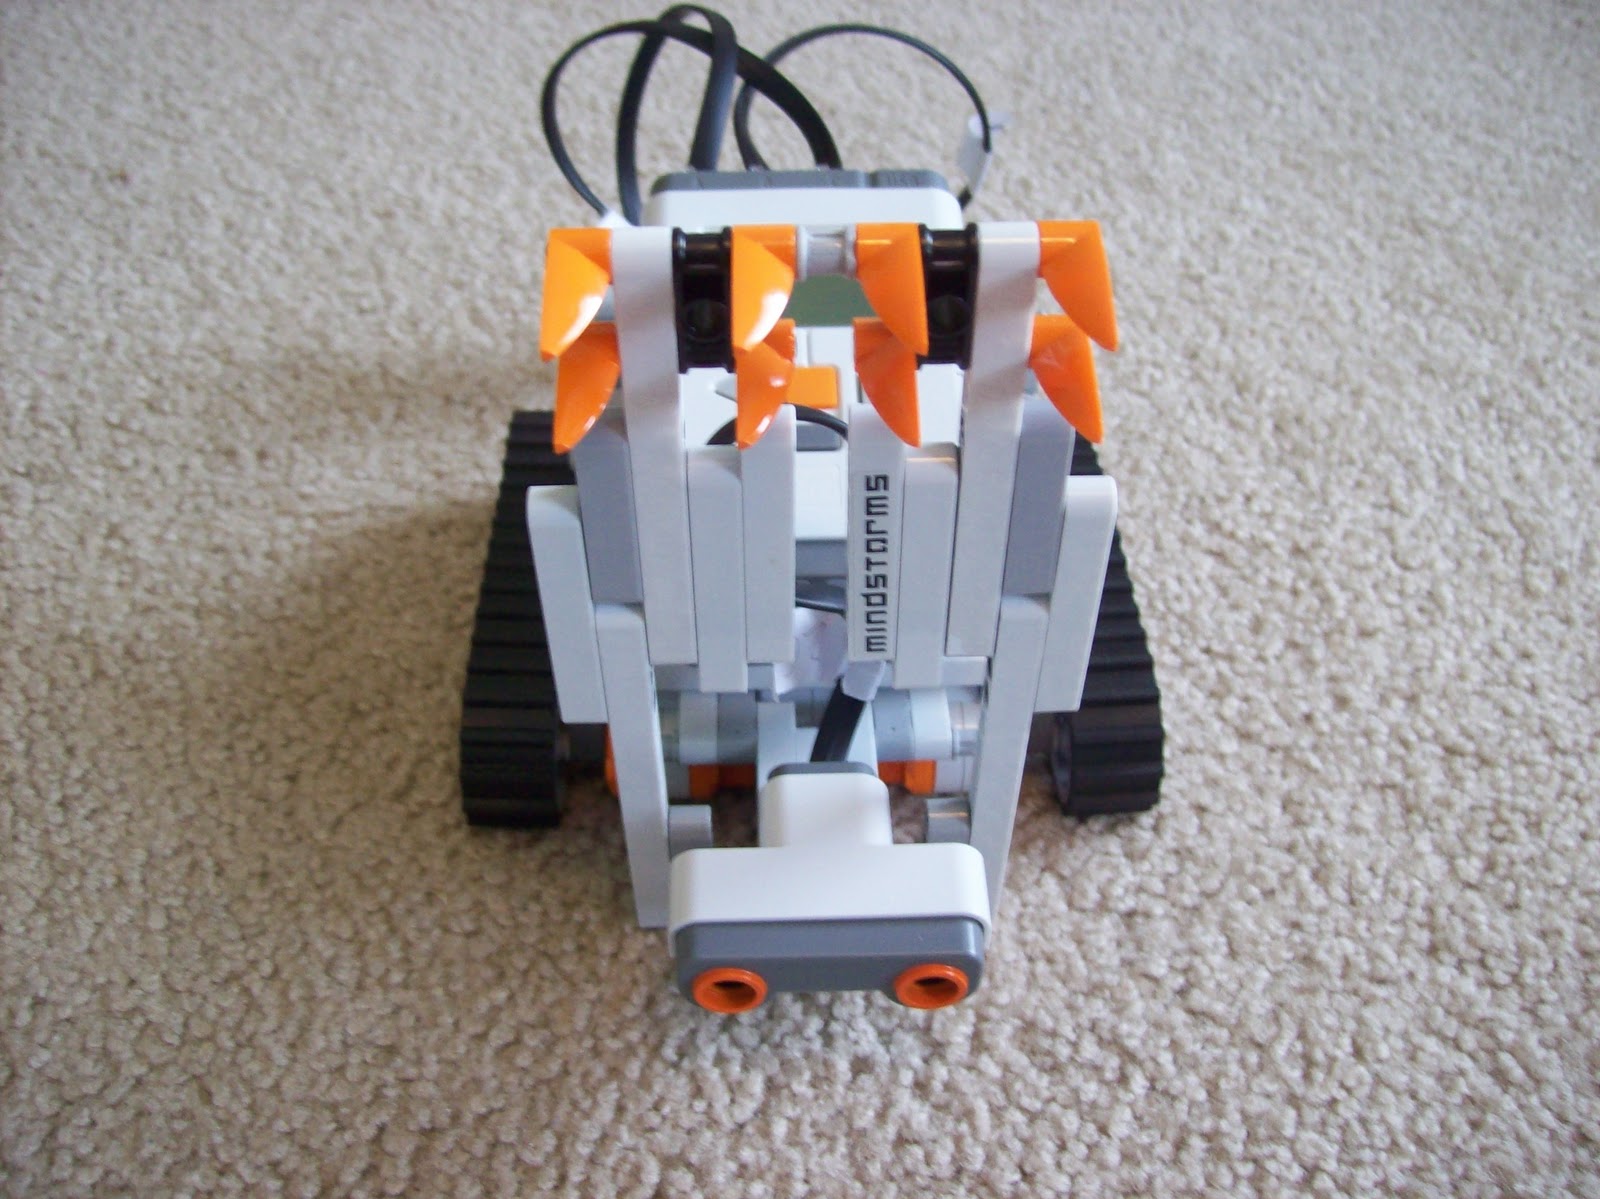
Turtle Bot

A bot that wears it's NXT brick on the back like a turtle's shell. It has two Zamor sphere launchers and an ultrasonic sensor in the front. This is the first time I have succeeded in making a compact zamor tank, and I think it is pretty awesome The breakthrough was to have the motor powering the launcher backwards so that I don't have a really long gun. Main pic: top front view pic 2: back aerial view pic 3: front aerial view pic 4: back view w/ spheres in tray pic 5: front view w/ spheres

Launchers!
This is the big thing about this bot. My backwards arrangement enabled me to make this bot compact. Main pic: shows backwards motor mechanism (Normally the NXT would be on top of this part. pic 2: close up on the actual motor pic 3: another pic of back motor mechanism pic 4: the forward firing mechanism with the tray removed pic 5: the tray

Driving base

 The base of this vehicle is important because it enables the bot to move. Main pic: bottom view pic 2: another bottom view pic 3: pic of the beam that connects motors in the rear.

Movie!

Movie of the bot executing its primary program, shooting you, and doing wheelies. (pic is repeat)

Cubology step 7: Solve last layer sides

Are you ready to solve this cube? Yeah you are! Only one more step:

1: Do one of these. It's that simple:

NOTE: Denny Dedmore originally invented two algorithms for this step, the Dedmore H and the Dedmore Fish, but they needed a lot of improvement. My Fish algorithm is 6 moves shorter than his, and my X algorithm is 18 moves shorter than doing two H's like he suggests.

2 (What's this? I said one more step...): Celebrate! Practice solving the cube so you can become faster and show off your cube solving skills to your friends. They'll be impressed.

Cubology step 6: Switch last layer sides

Note: The pictures in this section must ignore the orientation of the side cubies, so act like side cubies with one facelet the color of the top layer are completely the color of the other facelet (If the top layer is green, act like a green and white corner is completely white).

1: If one of the side cubies is in the right place (Between the two middles the same color as it's facelets. It can be flipped, you'll fix that next step), turn the cube until it is in the front and do one of  these:

Your side cubies should be in the right place. Just one more step to go!

2: If none of the sides are in place, execute either of the step 1 algorithms. You should end up with one side in place, so do step 1 to put the side cubies in the right place.

Cubology step 5: Solve last layer corners

1: If you can turn the cube so the top layer looks like one of the pictures below (The rectangles represent the facelets on the edge of the top layer. Also, ignore the side cubies), use the corresponding algorithm. Your corners will be solved.

2: If the top layer cannot be matched to one of those patterns, match it to one of these:
Then execute the first algorithm (Solve top corners left). You should be left with one of the patterns in step 1, so do step 1 to solve your corners.

Cubology step 4: Switch last layer corners

1: Find two top layer corners that are next to each other and share one color besides the color of the top face.

2: Turn the top layer until those two corners are between the faces of the two colors they have in common (the color of the top face and the other one mentioned in step 1)

You should now have 2 pairs of corners: A front pair sharing the color of the front face, and a back pair sharing the color of the back face.

3: Check to see which pairs are switched. If a pair is switched, the corner that shares a color with the left face is on the right and the corner that shares a color with the right face is on the left.

4: Use one of these algorithms to switch the pairs that are switched. If none are switched, skip this step.

5. All of the corners should now be in the right position. Just 3 more steps to go!

11/24/11

Cubology step 3: Solve center layer sides

Note: "Sides" here refers to side cubies, not to the sides of the center layer, which are center cubies.

1: Find a target cubie (a side cubie with no facelets the color of the top layer)

2: If it is in the top layer, rotate the top layer until it lines up with one of the second layer middles. It should make a shape like an upside-down T. Use one of these algorithms:

 3: If it is in the right place, but flipped use this:

4: If it is in the second layer, but in the wrong place use one of the step 2 algorithms to knock it out.

5: Repeat steps 1 thru 4 until all the second layer sides are solved.

Cubology step 2: Solve first layer corners

1: Find a target cubie (a corner cubie with a facelet the color of the bottom face)

2: If it is in the top layer, rotate the top layer until it is above the target position (The target position is in between the three middles of the same color as the target cubie's facelets) and use one of these to solve it:

3:If it is in the right place, but flipped, use one of these:

4: If it is in the bottom layer, but in the wrong place use one of the step 2 algorithms to knock it out.

5: Repeat steps 1 thru 4 until all the first layer corners are solved.

Cubology step 1: Solve first layer sides

 Note: Because there are no cubies solved at the start of this step, you can often use simpler algorithms to solve these cubies. Once you have experience solving a Rubiks cube, you can ignore these algorithms and do it your own way.

1: Find a target cubie (a side cubie with a facelet the color of the bottom face)

2: If it is not in the top layer, use one of these to get it there:

3: Once it is in the top layer, rotate the top layer so the cubie is above the target position (The target position is in between the two middles of the same color as the target cubie's facelets) and use one of these to solve it:

4: Repeat steps 1 thru 3 until all of the first layer sides are solved.

Cubology: Defining terms.

The following is a list of terms you'll need to know in order to understand my Rubik's cube solution.


 General:

Cubology: The study of Rubiks cubes. (I completely made word this up)

Layer: A section of the cube that can be rotated. I normally refer to the horizontal layers: top, middle (or center) and bottom.

Face: One of the six sides (not to be confused with side cubies) of the cube.

Cubie: One of the 26 cube-like pieces that make up a Rubiks cube. There are 9 cubies (3 by 3) in each horizontal layer of the cube except the center layer, which doesn't have a cube in the middle.

Facelet: One of the square stickers on the cube. 9 of these make up a face.

Corner cubie (or just Corner): A cubie with 3 facelets. They also form the corners of every face.

Side cubie (or just Side): A cubie with 2 facelets. They also form the sides of every face.

Center cubie (or just Center): A cubie with 1 facelet. They also form the center of every face.

Note on center cubies: Center cubies never move compared to the center of the cube. They are directly attached to the frame, but can spin around in place. For that reason, the color of a face is determined by the color of it's center.


Notation:

Target cubie: The cubie you are currently working on. This is darkened in my drawings.

Target position: The position where the target cubie should go. This is blue in my drawings.

Target color: The color of the face of the layer you are working on (During the first 2 steps this is the color of the bottom face, during the last 4 steps it is the color of the top face). This is green in my drawings.

Matching color: All of the facelets of this color in my drawings are of one color (they are all the same color) on the real cube. These are red and yellow in my drawings.

Move: Rotating one layer of the cube. My notation system includes 14 of these:
 In the center are the two moves which turn the front layer. The others are fairly easy to understand. Just move a row of the front face in the direction of the arrow.

Algorithm: A set of moves used to manipulate the target cubie. Each algorithm has a name (most of which I invented) and a picture showing what the cube should look like before you do the algorithm. Most of the pictures are 3D, but ones marked "TV" are a top view of the cube. On all of the pictures, the side marked "F" is the front.

11/23/11

Backlog: ToothBot

This was originally posted on NXTlog. It was my first project after I bought the NXT 2.0 set:

ToothBot

Since I got mindstorms NXT 2.0 a few days ago, I got bored with the models it included instructions for. Robogator in particular is disappointing (poor walking mechanism, and it can't bite anything. I built my own robot with jaws from the starter model, and it turned out quite nicely. It includes only parts that come out of the box with NXT 2.0

Jaws


Ok, maybe only one jaw. The lower jaw would inhibit it biting things. It bites weakish lego walls, and sometimes my feet. (oops!) I'm glad to say it doesn't really hurt. This is all I really added to the quickstart model to make this project. Big thanks to Lego for giving me the base of this project. Pic 1-front Pic 2-top Pic 3-bottom Pic 4-base Pic 5-back diagonal

Movie


The picture is one of the walls ToothBot attacks. The video shows it attacking a few of those walls. The program I used wasn't very precise, but it worked pretty well for a first project. I may have to reconstruct ToothBot and make a better program. UPDATE: I have reconstructed ToothBot and improved the program, see my new blog post.

NOTE: This video never appeared on NXTlog. I couldn't find a way to convert videos back when I posted this project, so you are the first to see it.

More pictures


Pic 1-overall view with jaw down Pic 2-front view with jaw up Pic 3-only back half (identical to starter model) Pic 4-wiring (including manual correction, which I discovered on my own =))

Backlog: Hurricane Launchers

A long time ago... (Ok, more like 2 or 3 years ago) I discovered the brilliant projects of Brian Davis. He researched Lego weapons and found that Zamor Sphere launchers are the best for use with motorized sets. He then developed a series of Zamor machine guns. First came DAZLR, a two-barreled (Dual Action) Zamor launcher. Next he made QuAZLR which, as you might have guessed, is a four barreled (Quad Action) version. Next he made it more compact, producing the Hailstorm Launcher, which was the pinnacle of Zamor launching technology for nearly 2 years. It fires 9.5 spheres per second, with devastating effect.

Hailstorm Launcher

With these projects, Brian Davis instilled in me a fascination with Zamor machine guns. When I got my own NXT set, I soon created Zamor launching robots of my own, but the only time I was able to match the power of a Hailstorm Launcher was when I copied the exact design. That changed forever when I brought a dual-action Zamor launcher to robotics club and Thomas Kein tinkered with it. He changed the gear ratio to make it fire faster, and by doing so he inadvertently changed the entire field of high RoF (Rate of Fire) Zamor launchers (Which I admit is pretty small). Soon afterwards I developed the Hurricane Launcher mark I, which fires 11 spheres per second.

Hurricane Launcher mark I

That little piece of machinery may not seem like much, but it not only broke the 2 year record of the Hailstorm Launcher, it paved the way for my other Hurricane Launchers. Just 2 weeks after I made the mark I, I had torn it apart and made a bigger version. The Hurricane mark II held the speed record for about 8 months with 22.5 spheres per second, more than twice as fast as any previous launcher.

Hurricane Launcher mark II

Now, I might have stopped there, but the Hurricane mark II was much less efficient than the Hailstorm launcher, and I wanted to improve that. I did a bit of research into the subject, and the result was the Hurricane mark III, which didn't fire as fast as the mark II because it only had 2 motors, but which was more efficient than even the Hailstorm. It fired 20 spheres per second, with an efficiency of 10 spheres per second per motor.

Hurricane Launcher mark III

Thus in less than 2 months I shattered both the speed and efficiency records of the Hailstorm Launcher, which had held both for nearly 2 years. Of course, I didn't stop there either. I continued to revolutionize the field of Zamor launching technology in the time since then, but that's a topic for another post.

Moved: Trinary numbers and math

This was posted a few years ago on my previous blog (which I abandoned). I updated it slightly:

In my last post I explained how Trinary logic can be used in place of binary logic, now I am going to show you how multidigit Trinary numbers work and how to add, subtract, multiply and divide them.

Trinary numerals greater than 1 or less than - work much like normal numbers. You take place value (1, 3, 9, 27, 81, 243, etc.) and multiply it by the digit value. The diference in trinary is that digit values can be negative. For instance:

1-01 = 27 - 9 + 0 + 1 = 19

In this way, counting in Trinary goes like this:

0, 1,
1-, 10, 11,
1--, 1-0, 1-1, 10-, 100, 101, 11-, 110, 111

and so on.


NOTE: Here I transition from counting to math, and it gets confusing. You might want to write out the trinary numbers and perform the math as I explain it.


Addition in Trinary

Say we are adding 123 and 21.
In Trinary these are 1----0 and 1-10
We add right  to left. Column 1 is 0 + 0 which equals 0. Column 2 is - + 1 which equals 0.

Colunm 3 is is - + -. Here is where we get to the weird part. In trinary addition, we can end up with "borrowing" as we would in normal subtraction. We put a 1 at the bottom of column 3 and a - at the top of column 4. Column 4 now has two -'s and one 1, so it equals -. For the next two columns we just bring down the value from the top row because the bottom row is empty. Our final answer is 1--100, which is 243 - 81 - 27 + 9 = 144. Carrying out the same calculation in base 10, we discover that 123 + 21 = 144.


Subtraction in Trinary

The easiest way is to negate the second number and add them. In Trinary, negation is easy. The opposite of 1 is - and vice versa, so to negate a number we simple change every 1 into - and vice versa.

Say we are doing 154 - 62
154 is 1-0-01
62 is 1-10-
-62 is -1-01
So we are performing 1-0-01 + -1-01

Column 1 is 1 + 1, so we write - in the bottom of column 1 and 1 in the top of column 2. As it turns out, the other numbers in column 2 are all 0's so we write 1 in the bottom of it as well. Column 3 is - + -, so we put 1 in the bottom of column 3 and - in the top of column 4. Column 4 is - + 0 + 1, so put 0 in the bottom of column 4.
Column 5 is - + -, so we put one in the bottom of column 5 and - in the top of column 6. Column 6 is now - + 1, so we leave it blank.

Our answer is 1011-, or 81 + 9 + 3 - 1, or 92. Performing 154 - 62 in base 10, we discover that it also is 92.


 Multiplication in Trinary is like repeated addition and subtraction.

I will start with a simple square, 8 * 8.
8 is 10-

We start from the bottom right. - times 10- is -01 Since this is in the first bottom digit we do not shift it. 0 times 10- is nothing. 1 times 10- is 10-, but since it is in the third digit, we need to shift it two digits to the left to get 10-00.
We add 10-00 and -01 to get the answer.
Coumn 1 is 1. Column 3 is - + -, or 1 with a - in column 4. We bring down the - in column 4 because column 4 is empty. Column 5 is 1.

Our answer is 1-101, or 81 - 27 + 9 + 1, or 64.


Division is repeated addition and subtraction as well.

Say we are performing 60/10.
60 is 1-1-0
10 is 101

This should come out evenly in Trinary because we know it does in base 10.

The division question in Trinary is "Can +or- B be subtracted from this part of A?" instead of "Is B less than this part of A?".


 In division we work from left to right. So, first we look at the first 3 digits, 1-1. Positive 101 can be subtracted from 1-1 to make -0, so our answers 3rd (3rd from the right) digit is 1. Now we have -0-. Negative 101 can be subtracted from -0- to make 0. Our 2nd digit is -. We are left with 000, so out 1st digit is 0. Our answer is 1-0, or 9 - 3, or 6.

Moved: Trinary logic

This was posted a few years ago on my previous blog (which I abandoned). I updated it slightly:

I was recently reading a book on binary logic circuits, and I got an idea. Since electronic charges can be positive or negative, why not make a logic system with three values: positive charge, negative charge, and no charge. I invented a system of "trinary" logic which uses these three values. I don't know if it could be implemented in hardware, but I know it could be easily implemented in software.

The rules of trinary logic are:
The + and * functions represent addition and multiplication as in normal math, but 1 + 1 = -1 and -1 + -1 = 1

This means that and number plus itself is the opposite of itself:

0 + 0 = 0 * -1 = 0
1 + 1 = 1 * -1 =  -1
-1 + -1 =  -1 * -1 = 1

This makes trinary logic useful in constructing cryptographic systems (systems of codes)

I recommend that the negative symbol (-) be used to represent -1 because -1 is the only negative value in trinary. Similarly, you can substitute "neg" for -1 while speaking.

Backlog: BogieBot (FTC)

Last school year (2010-2011) I participated in the FIRST Tech Challenge competition through my local robotics club. In FTC, teams construct robots to compete in a game at regional and national competitions. Last year's game was FTC "Get Over It!"

Game explanation
We designed an innovative type of rocker bogie suspension for our robot, which we named BogieBot. The Lego prototype that I personally built was able to climb over all the terrain, even climbing up the cliffs!
 Prototype video
Our first scoring design was very ambitious. We tried to make an large arm head with conveyors on a huge arm that would grab and score batons.
Arm head teaser
Unfortunately, the arm head unbalanced the robot and the arm was so heavy it burned out motors. On top of that, it was nearly impossible for it to dispense batons (too much precision required). After our first competition, we tore out the entire arm assembly and designed a new scoring mechanism. It included a fast baton dispenser made mostly out of Lego parts.
Dispenser teaser
It included many other parts too, but I won't spoil it for you. Presenting... The completed BogieBot.  
Full robot
Thanks to technical difficulties, we didn't do well enough to qualify for the national competition, but we earned valuable experience and we made one of the best robots out there.

11/22/11

About fictional companies

DroidFreak Enterprises is a fictional company I created to develop my projects. It grew out of DroidFreak BattleTech (now a subordinate company), which develops my Lego weapons, everything from machine guns to tanks. I will add other subordinate companies as I make new posts.

Welcome to DroidFreak Enterprises

Hello, this is DroidFreak. Welcome to my new blog, where I will post all of my online projects in one place. You may know me as markdykstra36 on Youtube or droidfreak36 on NXTlog. I will copy content, such as videos and NXT projects, from other sites onto this blog and post some content that cannot be posted elsewhere, such as Power Functions projects and a Rubiks cube solution.

The following is a test of posting videos and pictures.

Storm Surge Video:


Shotgun Catapult Picture: