Showing posts with label Cubology. Show all posts
Showing posts with label Cubology. Show all posts
11/27/11
Rubik's Cube Solution PDF Files
I uploaded some PDF files of my Rubik's cube solution for your convenience. The first, which you can find here, is the complete cube solution copied from my blog posts (7 pages). The second, here, is just a list of all of the algorithms (3 pages). Once you've solved the cube a few times, you should be able to switch to the shorter algorithm sheet so you don't have to carry around and search through the full 7 pages to find algorithms. Happy cubing!
11/25/11
Cubology step 7: Solve last layer sides
Are you ready to solve this cube? Yeah you are! Only one more step:
1: Do one of these. It's that simple:


1: Do one of these. It's that simple:


NOTE: Denny Dedmore originally invented two algorithms for this step, the Dedmore H and the Dedmore Fish, but they needed a lot of improvement. My Fish algorithm is 6 moves shorter than his, and my X algorithm is 18 moves shorter than doing two H's like he suggests.
2 (What's this? I said one more step...): Celebrate! Practice solving the cube so you can become faster and show off your cube solving skills to your friends. They'll be impressed.
Cubology step 6: Switch last layer sides
Note: The pictures in this section must ignore the orientation of the side cubies, so act like side cubies with one facelet the color of the top layer are completely the color of the other facelet (If the top layer is green, act like a green and white corner is completely white).
1: If one of the side cubies is in the right place (Between the two middles the same color as it's facelets. It can be flipped, you'll fix that next step), turn the cube until it is in the front and do one of these:

 Your side cubies should be in the right place. Just one more step to go!
2: If none of the sides are in place, execute either of the step 1 algorithms. You should end up with one side in place, so do step 1 to put the side cubies in the right place.
1: If one of the side cubies is in the right place (Between the two middles the same color as it's facelets. It can be flipped, you'll fix that next step), turn the cube until it is in the front and do one of these:


2: If none of the sides are in place, execute either of the step 1 algorithms. You should end up with one side in place, so do step 1 to put the side cubies in the right place.
Cubology step 5: Solve last layer corners
1: If you can turn the cube so the top layer looks like one of the pictures below (The rectangles represent the facelets on the edge of the top layer. Also, ignore the side cubies), use the corresponding algorithm. Your corners will be solved.

 2: If the top layer cannot be matched to one of those patterns, match it to one of these:
 Then execute the first algorithm (Solve top corners left). You should be left with one of the patterns in step 1, so do step 1 to solve your corners.


Cubology step 4: Switch last layer corners
1: Find two top layer corners that are next to each other and share one color besides the color of the top face.
2: Turn the top layer until those two corners are between the faces of the two colors they have in common (the color of the top face and the other one mentioned in step 1)
You should now have 2 pairs of corners: A front pair sharing the color of the front face, and a back pair sharing the color of the back face.
3: Check to see which pairs are switched. If a pair is switched, the corner that shares a color with the left face is on the right and the corner that shares a color with the right face is on the left.
4: Use one of these algorithms to switch the pairs that are switched. If none are switched, skip this step.


 5. All of the corners should now be in the right position. Just 3 more steps to go!
2: Turn the top layer until those two corners are between the faces of the two colors they have in common (the color of the top face and the other one mentioned in step 1)
You should now have 2 pairs of corners: A front pair sharing the color of the front face, and a back pair sharing the color of the back face.
3: Check to see which pairs are switched. If a pair is switched, the corner that shares a color with the left face is on the right and the corner that shares a color with the right face is on the left.
4: Use one of these algorithms to switch the pairs that are switched. If none are switched, skip this step.


11/24/11
Cubology step 3: Solve center layer sides
Note: "Sides" here refers to side cubies, not to the sides of the center layer, which are center cubies.
1: Find a target cubie (a side cubie with no facelets the color of the top layer)
2: If it is in the top layer, rotate the top layer until it lines up with one of the second layer middles. It should make a shape like an upside-down T. Use one of these algorithms:

 3: If it is in the right place, but flipped use this:
 4: If it is in the second layer, but in the wrong place use one of the step 2 algorithms to knock it out.
5: Repeat steps 1 thru 4 until all the second layer sides are solved.
1: Find a target cubie (a side cubie with no facelets the color of the top layer)
2: If it is in the top layer, rotate the top layer until it lines up with one of the second layer middles. It should make a shape like an upside-down T. Use one of these algorithms:


5: Repeat steps 1 thru 4 until all the second layer sides are solved.
Cubology step 2: Solve first layer corners
1: Find a target cubie (a corner cubie with a facelet the color of the bottom face)
2: If it is in the top layer, rotate the top layer until it is above the target position (The target position is in between the three middles of the same color as the target cubie's facelets) and use one of these to solve it:


 3:If it is in the right place, but flipped, use one of these:

 4: If it is in the bottom layer, but in the wrong place use one of the step 2 algorithms to knock it out.
5: Repeat steps 1 thru 4 until all the first layer corners are solved.
2: If it is in the top layer, rotate the top layer until it is above the target position (The target position is in between the three middles of the same color as the target cubie's facelets) and use one of these to solve it:


5: Repeat steps 1 thru 4 until all the first layer corners are solved.
Cubology step 1: Solve first layer sides
Note: Because there are no cubies solved at the start of this step, you can often use simpler algorithms to solve these cubies. Once you have experience solving a Rubiks cube, you can ignore these algorithms and do it your own way.
1: Find a target cubie (a side cubie with a facelet the color of the bottom face)
2: If it is not in the top layer, use one of these to get it there:

 3: Once it is in the top layer, rotate the top layer so the cubie is above the target position (The target position is in between the two middles of the same color as the target cubie's facelets) and use one of these to solve it:

 4: Repeat steps 1 thru 3 until all of the first layer sides are solved.
1: Find a target cubie (a side cubie with a facelet the color of the bottom face)
2: If it is not in the top layer, use one of these to get it there:


Cubology: Defining terms.
The following is a list of terms you'll need to know in order to understand my Rubik's cube solution.
Cubology: The study of Rubiks cubes. (I completely made word this up)
Layer: A section of the cube that can be rotated. I normally refer to the horizontal layers: top, middle (or center) and bottom.
Face: One of the six sides (not to be confused with side cubies) of the cube.
Cubie: One of the 26 cube-like pieces that make up a Rubiks cube. There are 9 cubies (3 by 3) in each horizontal layer of the cube except the center layer, which doesn't have a cube in the middle.
Facelet: One of the square stickers on the cube. 9 of these make up a face.
Corner cubie (or just Corner): A cubie with 3 facelets. They also form the corners of every face.
Side cubie (or just Side): A cubie with 2 facelets. They also form the sides of every face.
Center cubie (or just Center): A cubie with 1 facelet. They also form the center of every face.
General:
Cubology: The study of Rubiks cubes. (I completely made word this up)
Layer: A section of the cube that can be rotated. I normally refer to the horizontal layers: top, middle (or center) and bottom.
Face: One of the six sides (not to be confused with side cubies) of the cube.
Cubie: One of the 26 cube-like pieces that make up a Rubiks cube. There are 9 cubies (3 by 3) in each horizontal layer of the cube except the center layer, which doesn't have a cube in the middle.
Facelet: One of the square stickers on the cube. 9 of these make up a face.
Corner cubie (or just Corner): A cubie with 3 facelets. They also form the corners of every face.
Side cubie (or just Side): A cubie with 2 facelets. They also form the sides of every face.
Center cubie (or just Center): A cubie with 1 facelet. They also form the center of every face.
Note on center cubies: Center cubies never move compared to the center of the cube. They are directly attached to the frame, but can spin around in place. For that reason, the color of a face is determined by the color of it's center.
Notation:
Target cubie: The cubie you are currently working on. This is darkened in my drawings.
Target position: The position where the target cubie should go. This is blue in my drawings.
Target color: The color of the face of the layer you are working on (During the first 2 steps this is the color of the bottom face, during the last 4 steps it is the color of the top face). This is green in my drawings.
Matching color: All of the facelets of this color in my drawings are of one color (they are all the same color) on the real cube. These are red and yellow in my drawings.
Move: Rotating one layer of the cube. My notation system includes 14 of these:
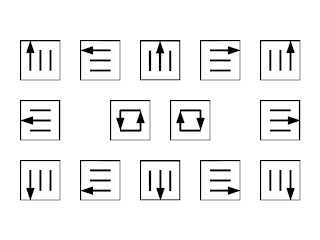 In the center are the two moves which turn the front layer. The others are fairly easy to understand. Just move a row of the front face in the direction of the arrow.
Algorithm: A set of moves used to manipulate the target cubie. Each algorithm has a name (most of which I invented) and a picture showing what the cube should look like before you do the algorithm. Most of the pictures are 3D, but ones marked "TV" are a top view of the cube. On all of the pictures, the side marked "F" is the front.

Algorithm: A set of moves used to manipulate the target cubie. Each algorithm has a name (most of which I invented) and a picture showing what the cube should look like before you do the algorithm. Most of the pictures are 3D, but ones marked "TV" are a top view of the cube. On all of the pictures, the side marked "F" is the front.
Subscribe to:
Posts (Atom)